About ANC-120e USB to Data Highway Plus (DH+) Converter
The ANC-120e allows you to connect a computer using a free USB port to a DH+ network and communicate with various DH+ enabled devices such as Allen Bradley’s PLC5, SLC5/04, SLC5/05, ControlLogix series and other devices which might support Allen Bradley DH+ network connectivity.
ANC-120e Highlights:
- Performs well with all PLC Programming/HMI/SCADA packages: Including all older versions of RSLINX Classic, latest RSLINX Enterprise with RSLOGIX 5/500, Wonderware DAS & TCP/IO Server, Citect Ethernet/IP, and Kepware Controllogix Ethernet/IP Drivers.
- Easy setup: Simple select the Controllogix Ethernet Driver in your RSLINX driver options.
- Affordable: $ USD 995 List is major price savings to the 1784-U2DHP.
- 12Mb USB Full Speed: No RS232 USB conversion bottleneck.
- 1784-xxxx Compatibility: Replacement to the 1784-U2DHP, and legacy 1784-PKTx, 1784-KTx, 1784-PCMK cards.
- DH+ Speeds: 57.6, 115.2 and 230.4 kBaud on communication cable lengths exceeding standard requirements.
- Auto Detect: Default Auto Baud Rate and Auto Polarity detection – no need for setup, simplifies cabling.
- Size: USB stick with no requirement for a external power supply.
- Easy DH+ connection: 2-pin Phoenix Blue Hose connector option or direct 8-pin mini din cable connection to PLC port.
- 30 day free trial and lifetime replacement warranty if defective.
USB To Data Highway Plus (DHP, DH+) – Using the ANC-120e, a lower cost alternative to the 1784-U2DHP
In today’s episode of The Automation Podcast I take a look at the ANC-120e USB to Data Highway Plus converter from Automation Networks. Now you may be asking yourself why the folks over at Automation Networks would release a USB to DH+ converter when Rockwell already makes the 1784-U2DHP? Well if you haven’t looked lately, that … Continue readingUSB To Data Highway Plus (DHP, DH+) – Using the ANC-120e, a lower cost alternative to the 1784-U2DHP
First Time Driver Installation
PLEASE NOTE: ANC-120e is using a standard Microsoft RNDIS driver that is usually included with all Microsoft operating system versions. In rare case when the Microsoft RNDIS driver is not included with the operating system, please use the driver package available as a download on our support website. Driver installation for Windows 2000 and Windows XP are similar to the instructions below.
Windows 7 Driver Installation If the device driver is not installed automatically, please follow the procedure below:
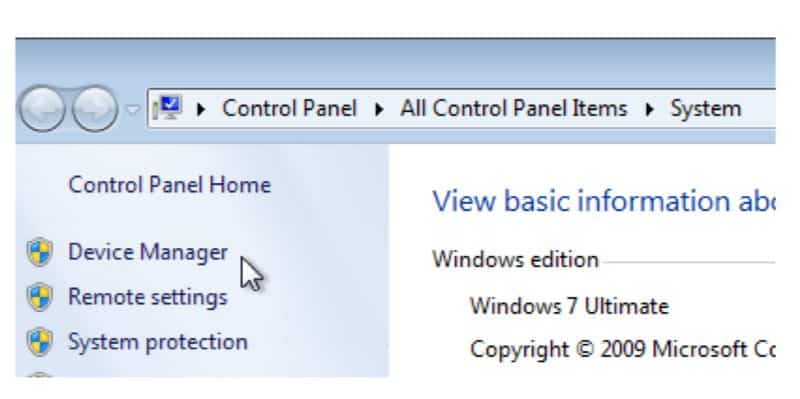
1. Click on Window’s “Start menu”
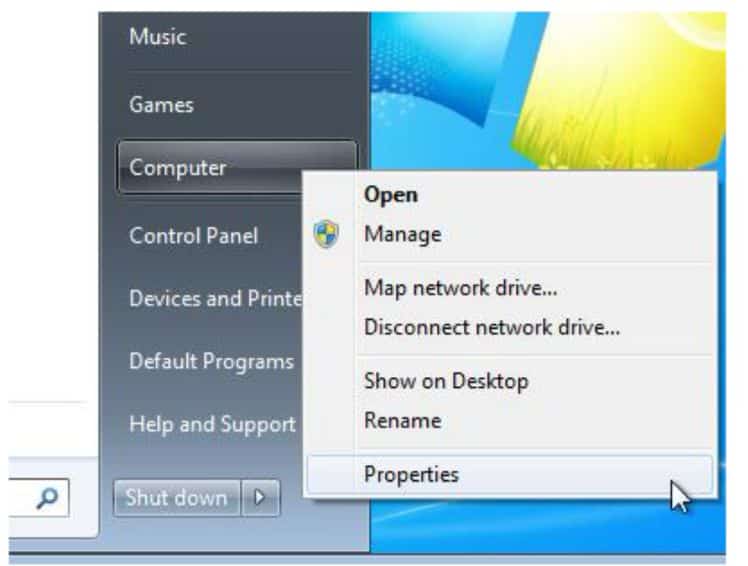
2. Right click on “Computer” icon
3. Click on “Properties”
4. Click on “Device Manager” tab in the “System” window
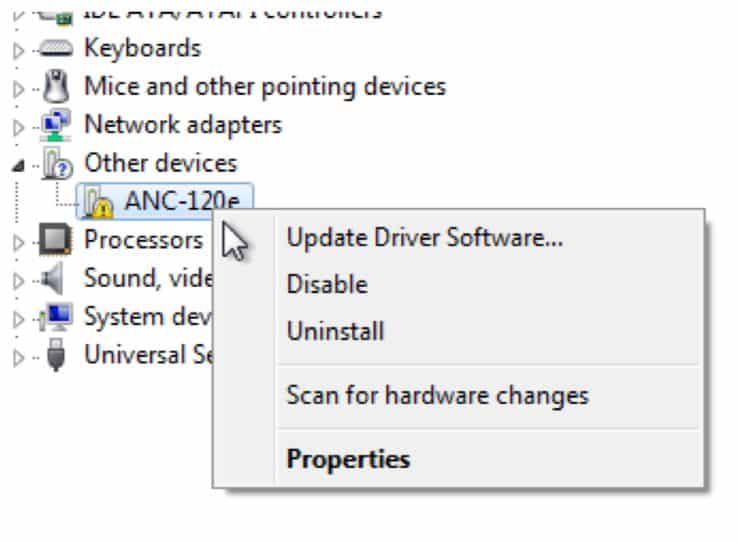
5. Under “Other Devices” category, locate the ANC-120e device with an attention symbol indicating that Windows was not able for find a correct driver
6. Right click on “ANC-120e” device icon
7. Click on “Update Driver Software…”
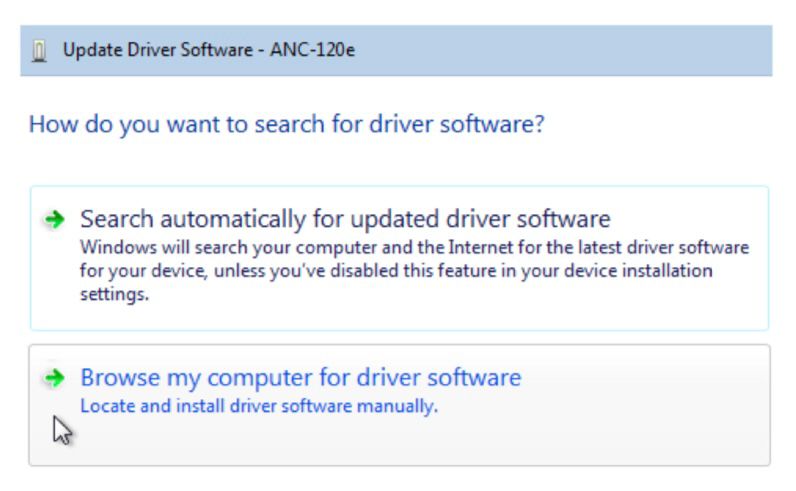
8. Click on “Browse my computer for driver software”
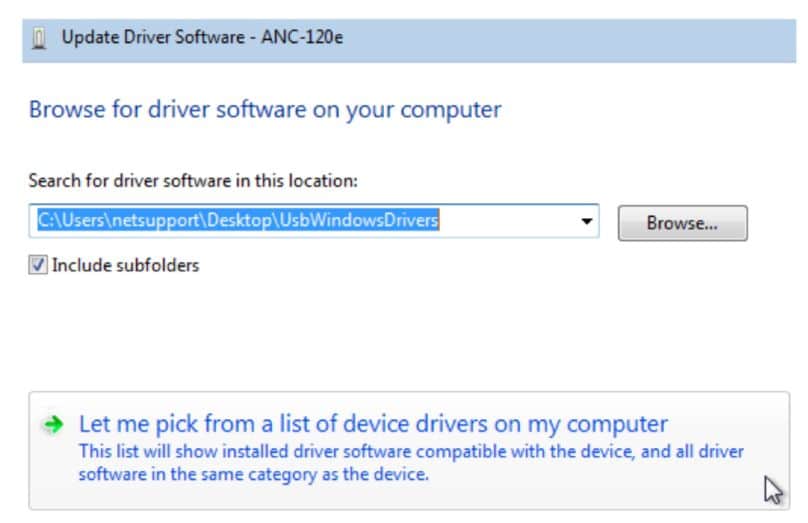
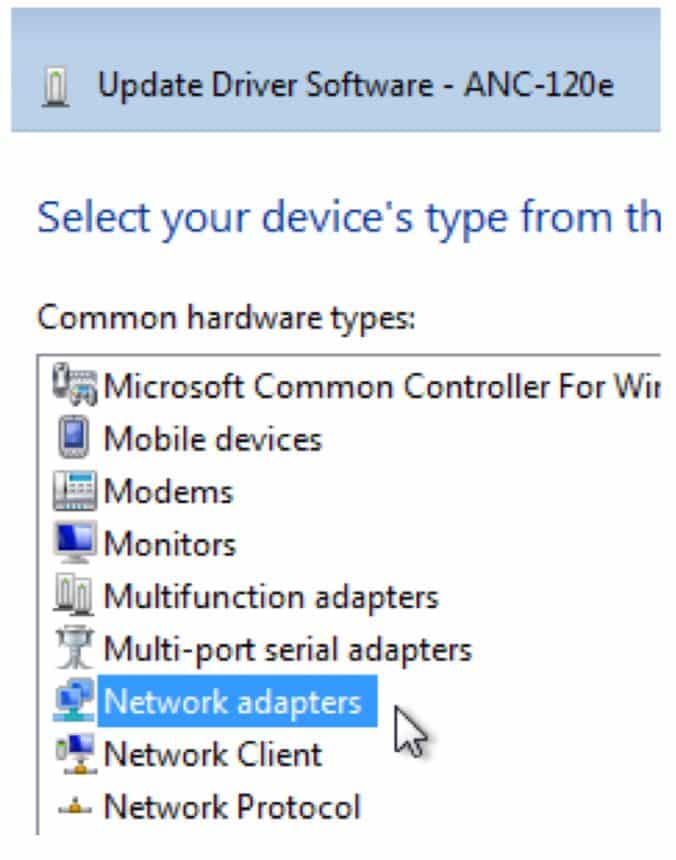
9. Click on “Let me pick from a list of device drivers on my computer”
10. Click on “Network adapters”
11. Click “Next”
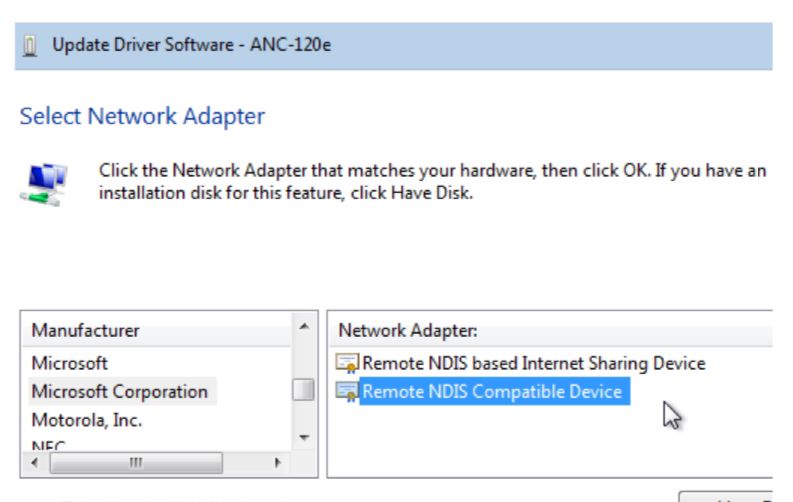
12. From the “Manufacturer” list, select “Microsoft Corporation”
13. From the “Network Adapter:” list, select “Remote NDIS Compatible Device”
14. Click “Next
15. You might get a Warning message when installing the driver
16. Click “Yes” button to continue
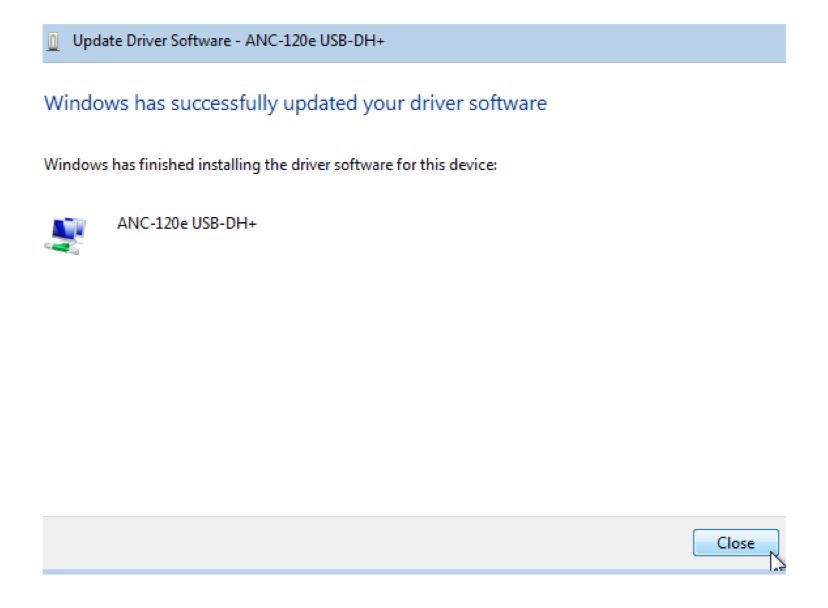
17. Click “Close” button when the driver installation is finished
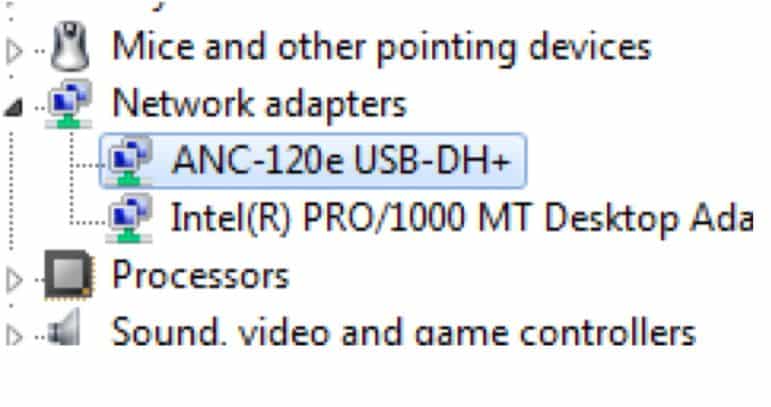
18. Check the “Device Manager” window. Now ANC-120e should appear as a new network adapter under the “Network adapters” list
Network Adapter Configuration
IMPORTANT: Before proceeding, make sure you already installed the ANC-120e driver and that the unit is connected to a USB port on your computer.
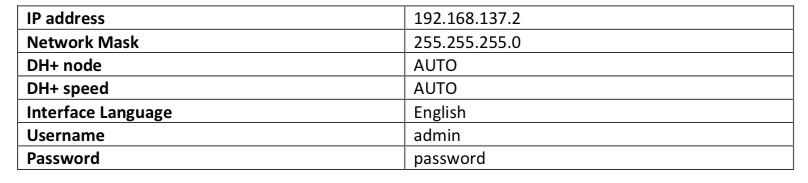
The RNDIS driver package supplied with ANC-120e, creates a new Ethernet network adapter which is used to communicate with the device over the USB port. The default IP address of the device is set to 192.168.137.2.
The first time the device is used, it is required to configure the network adapter created by the driver to use a static IP address in order to access the ANC-120e web configuration interface.
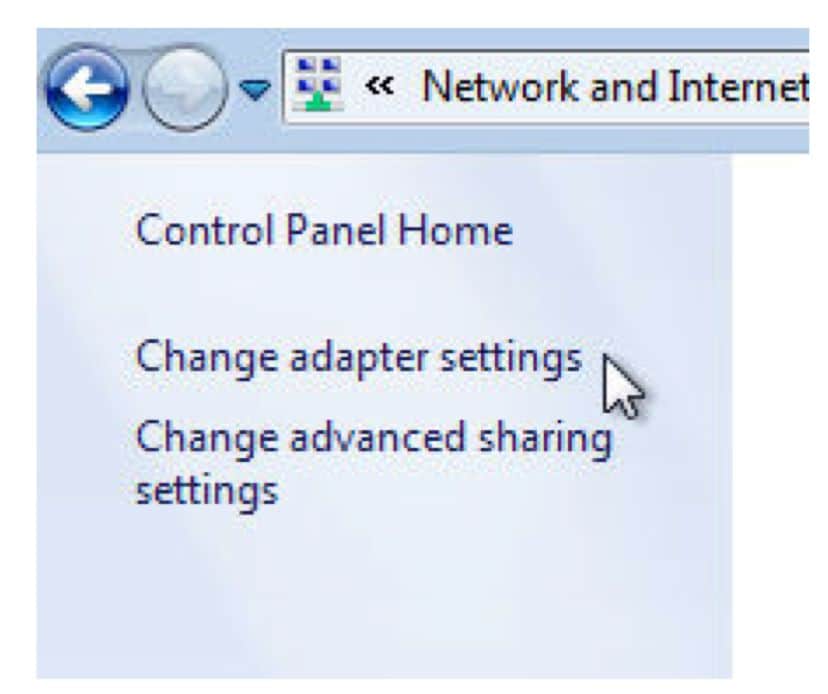
1. Open Window’s Control Panel
2. Click on “Network and Internet”

3. Click on “Network and Sharing Center”

4. Click on “Change adapter settings”
5. Locate a network adapter labeled “ANC-120e USB-DH+”. Please note, Windows OS can assign any number after “Local Area Connection” label, in our particular example, Windows OS had assigned a number 2 to our network adapter, hence it is displayed as “Local Area Connection 2”, but it can be different in your case
6. Right click on the corresponding network adapter
7. Click on “Properties”
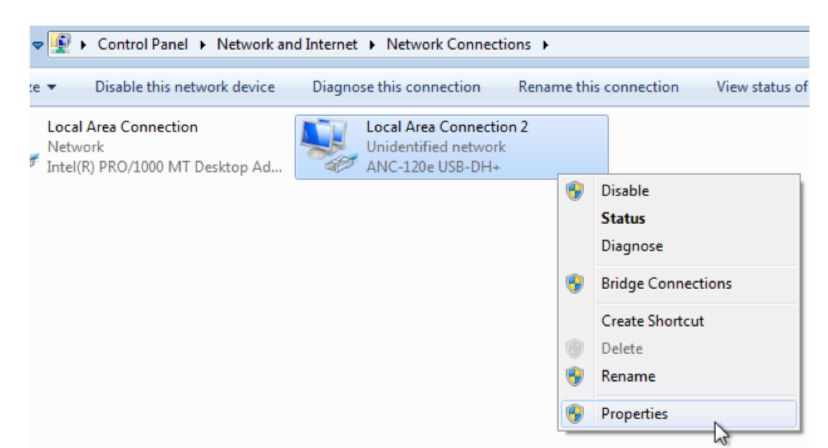
8. From the list of items, select “Internet Protocol Version 4 (TCP/IPv4)”
9. Click “Properties” button

10. Select the option “Use the following IP address”
11. Configure the adapter to use following settings: IP address: 192.168.137.1 Subnet Mask: 255.255.255.0
12. Leave the “Default gateway” and “DNS server” settings blank
13. Click “OK” button
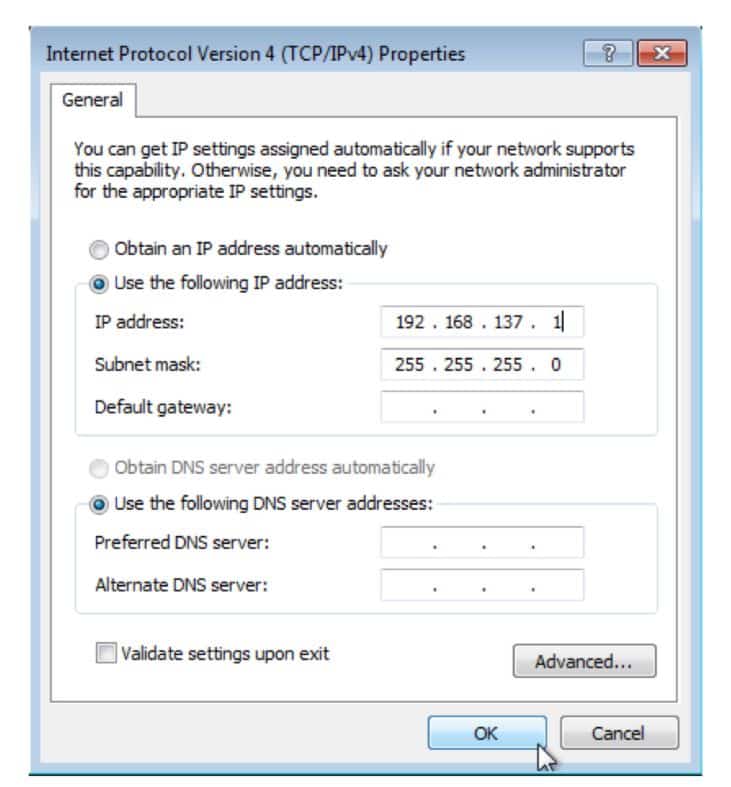
14. Click “OK” button to close “Local Area Connection” properties window
IMPORTANT: If your ANC-120e IP address/mask has been already configured with different values; it will be necessary to adjust the Virtual Network adapter’s IP settings to match the IP settings of the device. Or reset the device to factory defaults.
Using ANC-120e USB to data highway plus (DH+) Converter User’s Guide
Connections
To connect ANC-120e device to your existing DH+ network or directly to another DH+ device, please use one of the connectors included with the product.
IMPORTANT: Outer shield part of the DH+ cable is not used. Cable shield may be grounded if necessary, using Allen-Bradley recommendations.
1. Connect the DH+ cable to the ANC-120e.The polarity of the cable does not matter
2. Connect ANC-120e to the available USB port on the computer
3. The USB side light should blink intermittently for a moment
4. The DH+ light will blink every 3 seconds indicating that the device is connected and associated to a DH+ network
Due to ANC-120e unique Polarity Detection feature, the way the individual conductors (1/2) are connected does not matter, since upon startup, ANC-120e will AutoDetect and configure itself to use the correct polarity for successful communication regarding of the conductor cables connection.
LED Diagnostics
ANC-120e is equipped with two LEDs used for visual status and diagnostic display.
The LED closest to the USB connector indicates the data exchange between the ANC-120e and the user PC. When the device sends/receives a packet to/from the PC, this LED blinks indicating packet exchange.
The LED closest to the DH+ connector indicates the current status of the DH+ network:
• “LED Off” indicates that the device is not currently associated with a DH+ network.
• “LED blinks regularly every 3 seconds” indicates that the device is associated with the DH+ network
• “LED blinks fast without any particular pattern” indicates that the device is associated with the DH+ network and there is ongoing communication taking place with other nodes on the network.
Accessing ANC-120e User Interface
IMPORTANT: Before proceeding, make sure that you have installed the ANC-120e driver and configured the Network adapter correctly. Also make sure the unit is connected to your computer.
In case the previously configured IP settings were forgotten or lost and connection to the device cannot be established anymore, please perform the factory reset described in chapter “Reset to Default Factory Settings” of this manual.
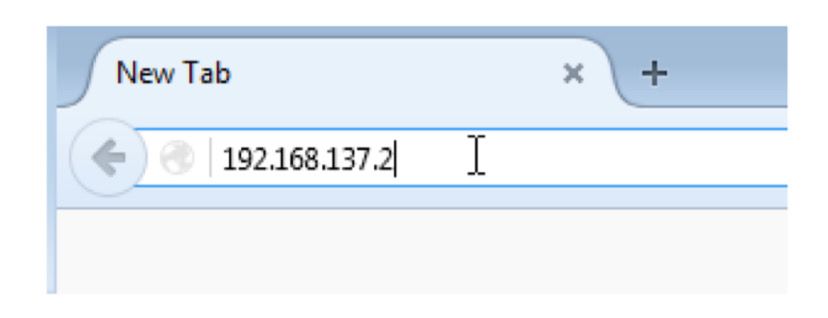
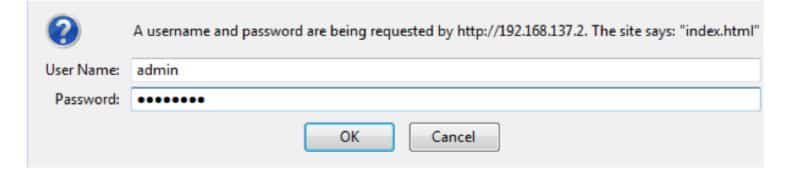
1. Open any web browser and enter the ANC-120e IP address in the address bar. Default IP address of the device is set to “192.168.137.2”
2. Press “Enter” key
3. Enter the username and password in the corresponding fields. By default, the username is set to “admin” and password to “password”
4. Click “OK” button.

5. If you entered the correct login credentials, you will be presented with the main configuration window.
Configuration and Interface
Device Settings
ANC-120e comes with several unique and innovative features designed to maximize the efficiency of the device usage under different scenarios. The paragraphs below explain those features in detail.
Automatic DH+ node assignment:
When “Auto” is selected in the “DH+ Node” drop down menu, ANC-120e will scan the DH+ network it is currently connected to, and will assign itself a free, unused node on the network to be used for all further communication. This unique feature is very convenient when the user needs to communicate with different DH+ devices on different networks and allows simple usage without the need to reconfigure the device using the web interface.
Automatic DH+ Baud Rate detection:
When “Auto” is selected in the “DH+ Baud Rate” drop down menu, ANC-120e will scan the DH+ network it is currently connected to, and will automatically detect and configure itself to use the correct network Baud Rate. This unique feature is very convenient when the user needs to communicate with different DH+ devices moving between different networks and allows simple usage without the need to reconfigure the device using the web interface.
Automatic Polarity detection
This unique feature allows connecting a DH+ cable without worrying about correct cable polarity.
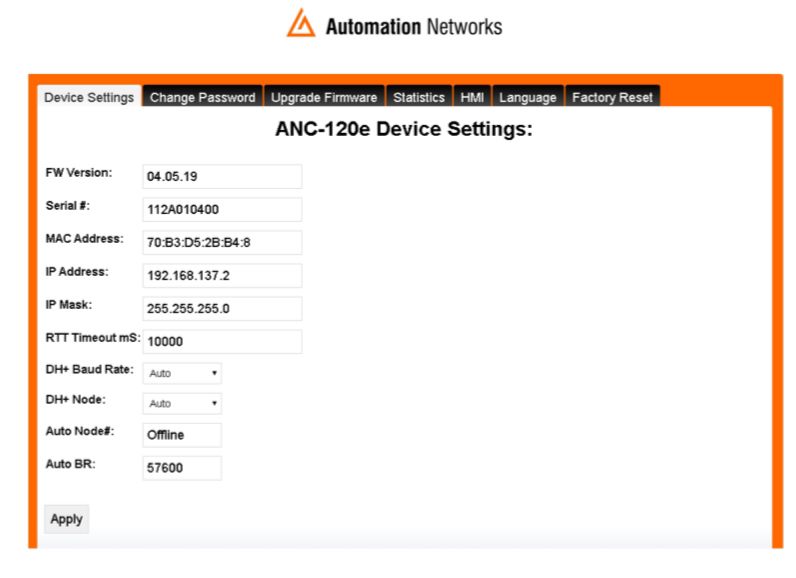
Main Configuration Window
The following information is displayed in the main configuration window:
• “Fw Version:” field displays the current Firmware version of the device
• “Serial #:” field displays the unique serial number of the device
• “IP address:” field displays the current IP address of the device, and allows the user to modify it is desired
• “IP Mask:” field displays the current network mask of the device, and allows the user to modify it if desired
• “DH+ Node:” drop down menu displays the current DH+ node settings for the device and allows the user to change it if desired. By default, device is set to automatic DH+ node assignment; please see the description of this feature at the beginning of this chapter
• “DH+ Baud Rate:” drop down menu displays the current DH+ network speed the device is configured to use and allows the user to change it if desired. By default, device is set to automatic DH+ speed detection; please see the description of this feature at the beginning of this chapter
1. Select the desired settings on the main configuration page
2. Press the “Apply” button
3. The device will reboot automatically, and new settings will take effect
IMPORTANT: ANC-120e IP address/mask settings must match the Virtual Network adapter’s IP settings. If you change the ANC-120e or the adapter’s IP settings, you also need to adjust its communication partner.
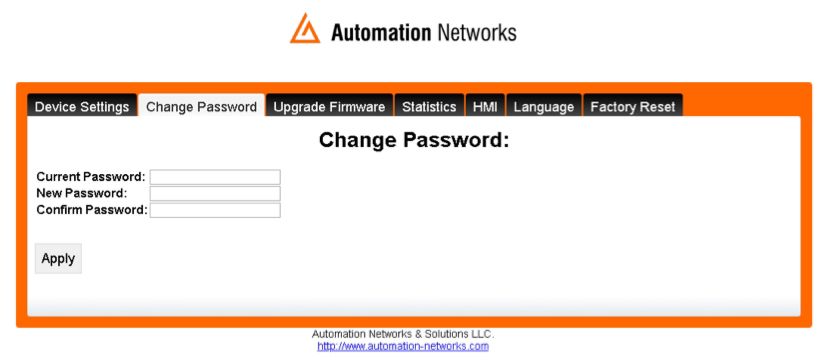
Device Password
IMPORTANT: It is strongly recommended to change the default device password default value to prevent unauthorized access and reconfiguration of the device.
To change the default web interface login password, please follow the steps below:
1. Type in the current password of the device into the “Current Password:” field. The default password is set to “password” from the factory
2. Type in the desired new password into the “New Password:” field
3. Type in the same new password into the “Confirm Password:” field
4. Click on “Apply” button
5. The device will reboot automatically, and the new password will take effect
Firmware Upgrade
IMPORTANT: Only upgrade the firmware with the firmware image provided by Automation Networks Inc. support staff and only when it is necessary to do so.
Make sure that the unit is disconnected from the DH+ network by unplugging the cable from the unit before proceeding with the firmware upgrade.
1. Open any web browser and enter the ANC-120e IP address in the address bar, default IP address of the device is set to “192.168.137.2”
2. Enter the username and password in the corresponding fields, by default, the username is set to “admin” and password is set to “password”
3. Click “OK” button
4. If you entered the correct login credentials, you will be presented with the main configuration window

5. Navigate to the “Upgrade Firmware” tab
6. Click on the “Upgrade” Button
7. Wait approximately 5 seconds until the device reboots into firmware upgrade mode
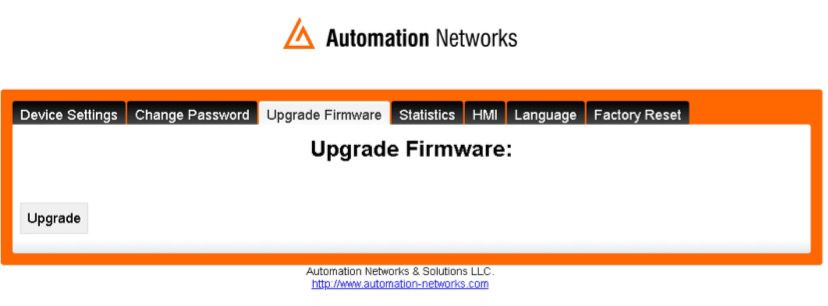
8. When device reboots into firmware upgrade mode, the device will appear as if it was a regular USB “memory stick” and will show up as another drive (in this example case the drive was assigned the letter “F:” by the Windows OS, however in your case it can be assigned any drive letter not currently used by Windows)
9. The drive labeled as “UPLOAD_DISK” will be available in “My Computer” and in “Windows Explorer” main window

10. Click on “Open folder to view files” in the pop up “Auto Play” dialog
11. Alternatively, you can open “Windows Explorer” application and double click on the “UPLOAD_DISK” drive to browse its content
12. Delete the currently stored file on the “UPLOAD_DISK” drive like you would delete any other file
13. Copy the new firmware onto the “UPLOAD_DISK” drive as you would copy any other file.
14. After the file is copied, the device will automatically reboot and start up in normal operation mode
IMPORTANT: It is necessary to delete the file from the “UPLOAD_DISK” drive before copying the new file! Make sure that you have a firmware file to program the unit when performing this operation. If you delete the file in the “UPLOAD_DISK” without copying the new firmware file after, the device will not be able to work, and the only available option will be a firmware upgrade.
Firmware upgrades will ensure that all the currently configured device settings are preserved and there is no need to reconfigure the device after the firmware upgrade.
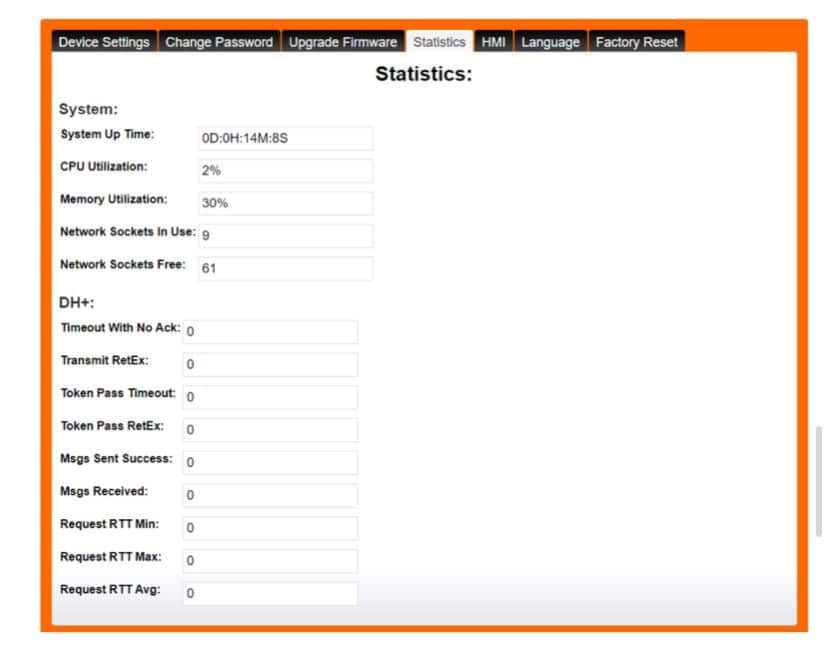
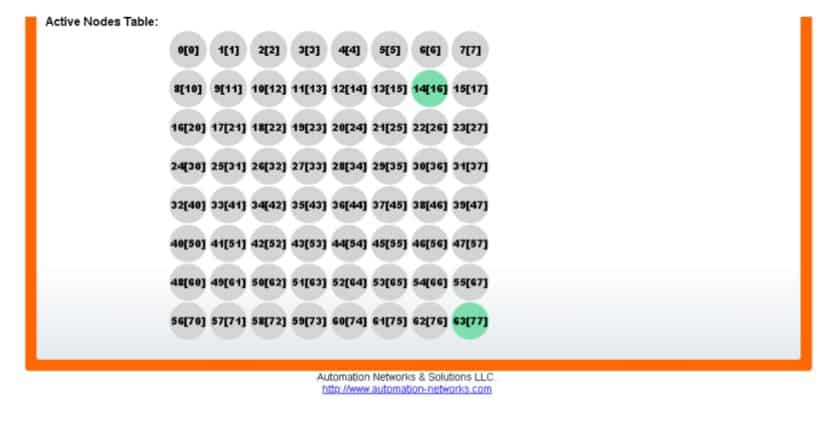
Statistics
screen provides a real time statistics data about the health of the device and the network it is operating on. This screen also provides the connection status to the DH+ network.
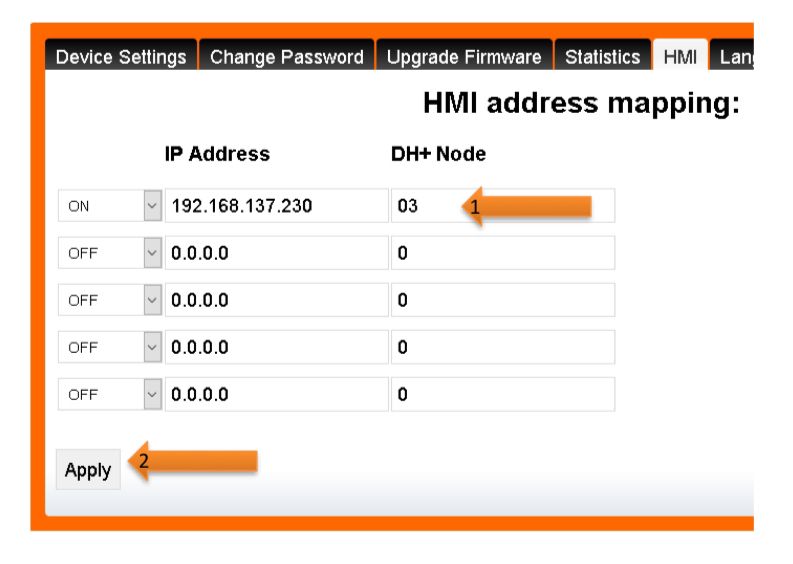
HMI
HMI screen enables you to use an IP address to communicate to a specific DH+ node directly. The HMI is used to enable PanelView’s or other devices in an ethernet network to communicate with DH+ nodes when they do not have the ability to use DH+ addresses. Here is an example of configuration.
For this example:
ANC-120e IP address = 192.168.137.2
SLC5/04*1 DH+ node = 03 (in decimal, not octal)
PANELVIEW PLUS 6*2 will use IP address = 192.168.137.229 I
P address assigned to SLC5/04 = 192.168.137.230
*1 If your SLC or PLC is in node 0 please use 00 in the HMI configuration.
*2 Always assign an IP address that is not being used in the network.
1. Turn ON the first row in the ANC-100e’s “HMI” tab in the web interface
2. Enter an IP address that is not being used (keep in mind that it has to be in the same network the ANC-100e is) and enter the DH+ node of the device that you are connecting to
3. You can repeat steps 1 and 2 for each row to communicate with up to 5 DH+ devices if necessary, using a different IP address in each row Click “Apply” and wait for the unit to reboot (5 seconds)
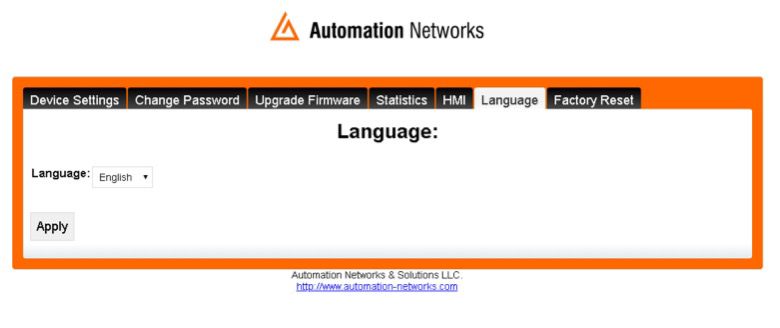
Language
Language tab offers English or Spanish language for the web interface. Changing the current web interface language does not require a device reboot.
Reset to Default Factory Settings:
To reset the device to factory default settings:
1. Connect the device to an available USB port on the computer and wait approximately 5 seconds
2. Use a paper clip or similar to press and hold the reset button located under the little hole next to the DH+ LED indicator light
3. Release the button when both LEDs light up
4. Device will reboot restoring its factory default settings IMPORTANT: Factory default settings for the device are: